I wanna make a fighting game! A practical guide for beginners — part 4 (2021 update)
This article was originally written by me and published at https://indiewatch.com on December 2, 2017. Since I have restarted this series of tutorials, I have come to the decision of reworking my earlier articles and uploading them to Medium, in order to have more control over them and update them in case of need.
Hitboxes and hurtboxes
Welcome to the fourth part of this series of introductory articles on the magic behind developing a fighting game!
In the previous parts, we’ve already discussed 2D vs. 3D, features to add, and how to schematize a character state-machine logic.
Now, let’s delve a bit more into the technicalities!
Hit where it hurts
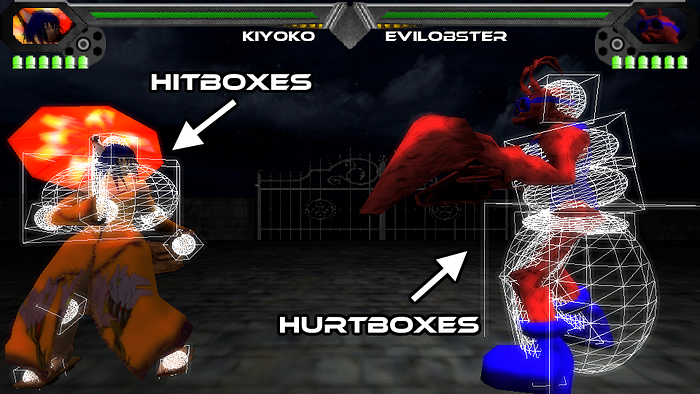
One core concept in fighting games is that characters can hit or be hit only with/at certain parts of their bodies, which can vary depending on the move performed, the character state, whether the character is moving or not, and several different factors.
This is normally accomplished by using two (or three — see later) specific objects called hitboxes and hurtboxes respectively.
Hitboxes are exactly what it says on the tin: they mark the part of your character that can cause damage to the opponent. They are usually activated only during an attack and only during a specific amount of frames (called active frames of a move).
Hurtboxes are the exact opposite: these objects mark where your character can be hit and are usually always active, unless the character is in a special state or performing some move with invincibility.
Usually, hitboxes and hurtboxes are dynamic objects, which change position every frame. Yeah, every frame you have to provide the game engine with information on the position of every single hitbox and hurtbox, in order to perform a proper collision management.
As I mentioned before, there is also a third category, which is sometimes a subset of the previous one. Since I haven’t found an official name around, I will use the term collision box to refer to it. Basically, they mark the area of the players which can’t overlap, setting a limit on how much can the character sprites/models can get near each other.
The implementation details vary between 2D and 3D and they will be analyzed separately. Notice that 3D-but-2D can use either of them: for example, Street Fighter V uses the 2D approach.

Test your might!
Hitboxes are the core of every move. When you define a move, you have to specify also the hitboxes, together with the damage they do on hit, the kind of reaction the opponent needs to be subjected to, the amount of time the opponent can’t move after being hit by said hitbox (appropriately called hitstun). It’s quite a lot of work and can be kind of annoying, since it has to be done for every single move, at every single animation frame.
Here’s where the difference between 3D and 2D pops in: in a 2D game, you have to manually create and move the hitbox at every frame to fit the sprite you are using, while in a 3D game you can “attach” the hitbox as an invisible “child” to the character model. This will make things easier, since the boxes will move together with arms, legs, and other body parts, requiring less maintenance but sacrificing a bit of flexibility. So, if you have a high frame rate (let’s say 60fps), 3D is definitely more viable for solo developers and for moves tied to the character model, while 2D allows for more bizarre moves at the same difficulty as normal moves, difficulty that it’s unfortunately higher from the beginning.
A shortcut for 2D developers is make use of frames which share the same hitboxes/hurtboxes positions and size, so that the number of steps is smaller and more manageable.
Baby, don’t hurt me! Don’t hurt me! No more!
All the concerns expressed for hitboxes are also true for hurtboxes: you also have to track them properly every frame, but this time you just have to be sure that they are active at the current frame to check collisions.
Hurtboxes have to match the character sprite / model in some way: when they don’t, ghost hits occur, leaving a bad taste in the player’s mouth (go to minute 02:47 to see what I mean):
See what I mean? There’s nothing more unsatisfying than defeating an opponent by hitting the empty space between their arm and leg with the invisible tip of your character’s boot (particle effects can offer a decent cover up, though). So, not only you have to move them, you have to make it such that they would fit the players’ expectation.
Stay away from me!
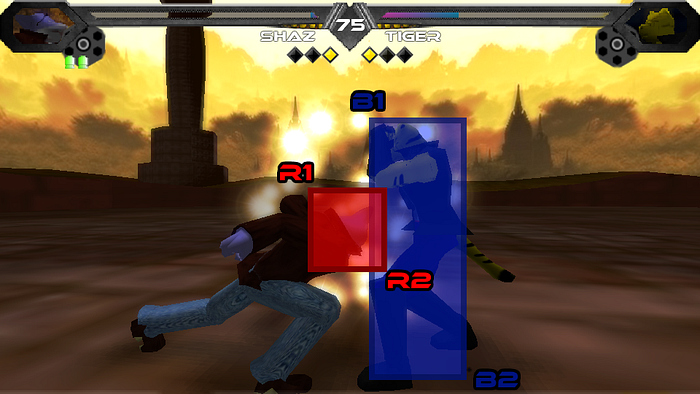
Collision boxes (sometimes called pushboxes) are not always required: sometimes you can just check collisions between hurtboxes to determine if the player overlap or not. They are mandatory when you want the characters to overlap during the move in a way that the hurtbox would not allow, however (think about a flying kick in which the leg of the attacker has a hurtbox but must go over the opponent’s body to hit).
Most of the times, collision boxes are smaller than the character’s hurtboxes (see, as a blatant example, Chang from KOF XIV).
As hurtboxes and hitboxes, collision boxes must track the sprite/model at every frame.
The programmer’s cheat sheet: how to implement all of this?
2D: Circles and Rectangles
Now that you know the basics, one simple question could arise: how can I implement those things effectively? The answer is: it requires patience and a bit of help from simple geometry.
In 2D, the two easiest shapes to manage are circles and rectangles, since they require easy algorithms and little computation time to check overlapping.
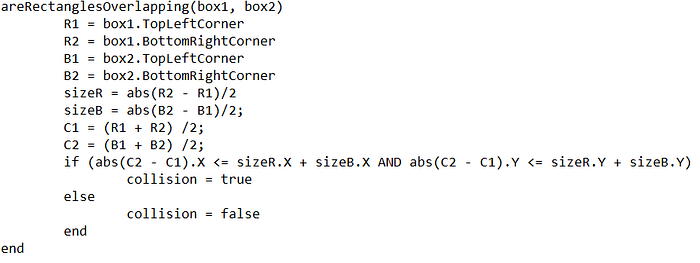
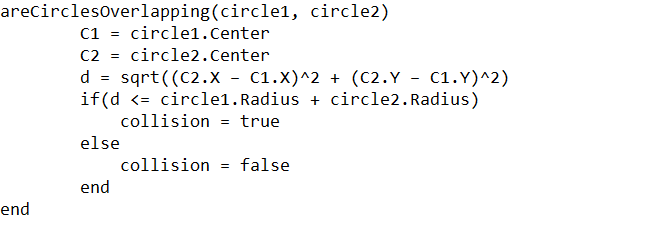
A circle is fully defined by three parameters: (X, Y) coordinates of the center, radius. A rectangle is defined by four parameters: (X, Y) of the top-left corner, and (X, Y) of the bottom right corner.
For example, if you build all your hitboxes and hurtboxes as a composition of rectangles OR circles (either one or the other), every frame you just have to check if two shapes collide.
Here you are a pseudo-code example for rectangles:
Circles are even easier to check, but they could be not good enough to fit your needs in terms of covering the sprite’s shape in an effective way:
Circles and rectangles are the two easiest solution in 2D and are a reasonable compromise between approximation and ease of use.
At every frame, you should store the position of every hitbox and hurtbox and check the overlaps. Every move and character state should have their own set of hitboxes and hurtbox, listed per frame. You can also interpolate the position between frames to reduce your workload (e.g. you define the hurtbox position at frame 1 and 5, then you perform a linear interpolation to evolve it over time, without having to rewrite it at every step), but it still requires lots of patience and dedication to prepare proper boxes for every situation.
3D: Spheres, spheres everywhere!
Adding a third dimension makes things easier from one side: since you don’t have sprites but models, you can attach the hitboxes/hurtboxes to the model’s bones so that they move together with the animation.
This is a simplification, from one side, but from the other this means that they way the character moves during e.g. his idle stance can potentially make some hits connect only at very specific frames .
Another non-negligible issue is how to manage collisions in 3D. The third dimension makes things harder, because, you know… 3D rotations.
So, if you don’t want to be caught into ray casting, matrix transformations and bizarre geometry quirks, the most straightforward way is to use spheres.
Since they are defined by four parameters only — center (X,Y,Z) and radius — the code for checking for collision is basically a simple extension of the 2D circle algorithm . Furthermore, , saving computation time and reducing the complexity of the process. you don’t have to care about rotations
However, you obviously have to care that the spheres map the character model decently well.
As an example, Super Smash Bros. Melee use spheres for the hitboxes/hurtboxes. Their rotation independence is the advantage that far outweighs other options (boxes, ellipses), which can be anyway considered in case you find a suitable algorithm, if your engine offers some smart solution to check their intersection, or you want to try out something different.
To sum up
Fighting game are based on collision management. Defining proper hitboxes and hurtboxes is vital for your game to be playable. 2D games require a lot more care on how to position/use hitboxes properly but are relatively straightforward concerning collision checks. On the other side, 3D games help you a lot with hitbox and hurtbox placing, but can become difficult to manage if you don’t have a grasp on 3D geometry.
Enough for today! Give me a shout if you found the article useful and don’t forget to send me your suggestion on Twitter (@AndreaDProjects)
See you next time!
Other articles in the series
- Part 1 — Introduction;
- Part 2 — Design decisions;
- Part 3 — Characters as state machines;
- Part 4 — Hitboxes and hurtboxes;
- Part 5 — Determinism;
- Part 6 — Input buffers and “reading” moves;
- Part 7 — Hit stun and combo systems;
- Part 8 — Implementing a simple block/guard system;
If you are interested in more game-making tutorials, you can find me on Twitter at @AndreaDProjects. My DMs are open!
Originally published at https://indiewatch.com on December 2, 2017. Edited and updated on the 25.09.2021 by the author.